
TL;DR: we are going to functionally test the ls command, the code is here.
Behat is a testing tool for PHP. But before understanding what behat is used for, you need to understand that different types of testing exist.
⚠️ I will try to explain here the differences between the types of tests, but let me warn you: each of us has its own vision of what is each type of test, don't be shocked to have another interpretation of the terms, here you will get mine only.
- Unit testing: this is the most obvious, but what you should know is that a pure unit test is not using any other thing than the class it tests, any interaction with another object should be mocked.
- Integration testing: this is basically unit testing, but by using a set of classes. Your test may reflect better the real world but may miss some cases.
- Functional testing: this is it! That's what behat is about. It's about running your application, giving inputs, getting results, and verifying results. Please note that you can use PHPUnit or PestPHP to build a functional test, behat is better (to me) because it allows the functional test to be readable for people of the business.
But before getting into our first test. You have to know one last thing: behat is special by the syntax it suggests to use. It's called Gherkin, and it comes from... Cucumber: the equivalent of behat for many other languages.
Testing ls
In its documentation, behat shows an example of a test of the command ls. But no code associated with the test. I suggest you to start with testing the ls command of your terminal.
Here is how looks a behat test, it's formatted with gherkin syntax. This test is copy/pasted from the documentation of behat:
Feature: Listing command
  In order to change the structure of the folder I am currently in
  As a UNIX user
  I need to be able see the currently available files and folders there

  Scenario: Listing two files in a directory
    Given I am in a directory "test"
    And I have a file named "foo"
    And I have a file named "bar"
    When I run "ls"
    Then I should get:
      """
      bar
      foo
      """
Let's make this file actually test something!
Creating a project
To test something with behat, it's (obviously) require to have a project up and running. Well, we are not going to code ls, so our project will only contain the test, but we need it anyway!
Start by running those commands in a new folder:
$ composer init --name "acme/test-ls" --description "testing ls with behat" --author "Nek <[email protected]>" --type=project -n
$ composer require --dev behat/behat
At this stage, you have a new PHP project, with behat installed locally. Let's init the project with the behat cli:
vendor/bin/behat --initBehat generates the following directory structure:
.
├── (composer.json)
├── (composer.lock)
|
|
├── features
│   └── bootstrap
│       └── FeatureContext.php
|
|
└── (vendor)
Behat generates the following directory structure for its tests: you should write the tests in the features directory and the bootstrap directory should contain the code related to your tests.
You may want to run the following command to learn how to use the gherkin language:
$ vendor/bin/behat --story-syntaxWriting the gherkin
This is the easy part, you should describe what you want to test and how in a file that will have the extension .feature, and this file should be located in the features directory.
I suggest you to create this file by taking the example we saw previously:
# features/ls.feature
Feature: Listing command
  In order to change the structure of the folder I am currently in
  As a UNIX user
  I need to be able see the currently available files and folders there

  Scenario: Listing two files in a directory
    Given I am in a directory "test"
    And I have a file named "foo"
    And I have a file named "bar"
    When I run "ls"
    Then I should get:
      """
      bar
      foo
      """
The first lines (2-5) have no actual meaning for our test, it's just some information you'd be glad to find if you have to read a behat test, you can see this as a comment, but here it's part of the language.
The Scenario: keyword starts an actual test. Each line will trigger a function that we will need to define.
Let's run the tests so behat help us with the functions! The option --append-snippets will fill our Context file.
$ vendor/bin/behat --append-snippetsThe result should be something like this:
[...]
1 scenario (1 undefined)
5 steps (5 undefined)
0m0.01s (8.37Mb)

 >> default suite has undefined steps. Please choose the context to generate snippets:

  [0] None
  [1] FeatureContext
 >
Just type 1 to tell behat to fill our Context file (we have only one!).
The result should look like this:
<?php

use Behat\Behat\Tester\Exception\PendingException;
use Behat\Behat\Context\Context;
use Behat\Gherkin\Node\PyStringNode;
use Behat\Gherkin\Node\TableNode;

/**
 * Defines application features from the specific context.
 */
class FeatureContext implements Context
{
    /**
     * Initializes context.
     *
     * Every scenario gets its own context instance.
     * You can also pass arbitrary arguments to the
     * context constructor through behat.yml.
     */
    public function __construct()
    {
    }

    /**
     * @Given I am in a directory :arg1
     */
    public function iAmInADirectory($arg1)
    {
        throw new PendingException();
    }

    /**
     * @Given I have a file named :arg1
     */
    public function iHaveAFileNamed($arg1)
    {
        throw new PendingException();
    }

    /**
     * @When I run :arg1
     */
    public function iRun($arg1)
    {
        throw new PendingException();
    }

    /**
     * @Then I should get:
     */
    public function iShouldGet(PyStringNode $string)
    {
        throw new PendingException();
    }
}
Notice how behat created annotations that will be read to match functions to sentences. You can see text in quote is transformed into an argument for the function. You can use many of them and change their name as well.
The actual test
Sentence 1: « I'm in a directory »
We just need to create a directory in a location of our choice.
    private string $directory;

    /**
     * @Given I am in a directory :directoryName
     */
    public function iAmInADirectory($directoryName)
    {
        $this->directory = __DIR__ . '/../../tmp/'.$directoryName;
        if (file_exists($this->directory)) {
            exec("rm -r {$this->directory}");
        }
        mkdir($this->directory, recursive: true);
        chdir($this->directory);
    }
As you can see, this is straightforward. I'm using basic PHP to create just what I need, this is fine, we're in a testing environment, locally or in a specific environment.
I take the time to add a property directory to my context so I can reuse it in other steps.
Sentence 2: « I have a file named »
The code will be super-simple here, we do not need any specific file:
    /**
     * @Given I have a file named :filename
     */
    public function iHaveAFileNamed($filename)
    {
        touch($filename);
    }
Sentence 3: « I run »
This may be the hardest one!
    private string $output;

    /**
     * @When I run :commandName
     */
    public function iRun($commandName)
    {
        exec("$commandName", $output);
        // PHP store array lines in an array
        // we need to make it a string to compare
        $this->output = implode("\n", $output);
    }
Sentence 4: « I should get »
Finally, we are going to verify that the output of our ls execution returned the expected output.
    /**
     * @Then I should get:
     */
    public function iShouldGet(PyStringNode $expectedOutput)
    {
        assert($this->output === $expectedOutput->getRaw());
    }
I use here the standard assertion of PHP, but you can also use PHPUnit assertions or the package from webmozart that helps you write assertions. Feel free to use what you used to!
This is it!
If you run the test now, you should see something like this :
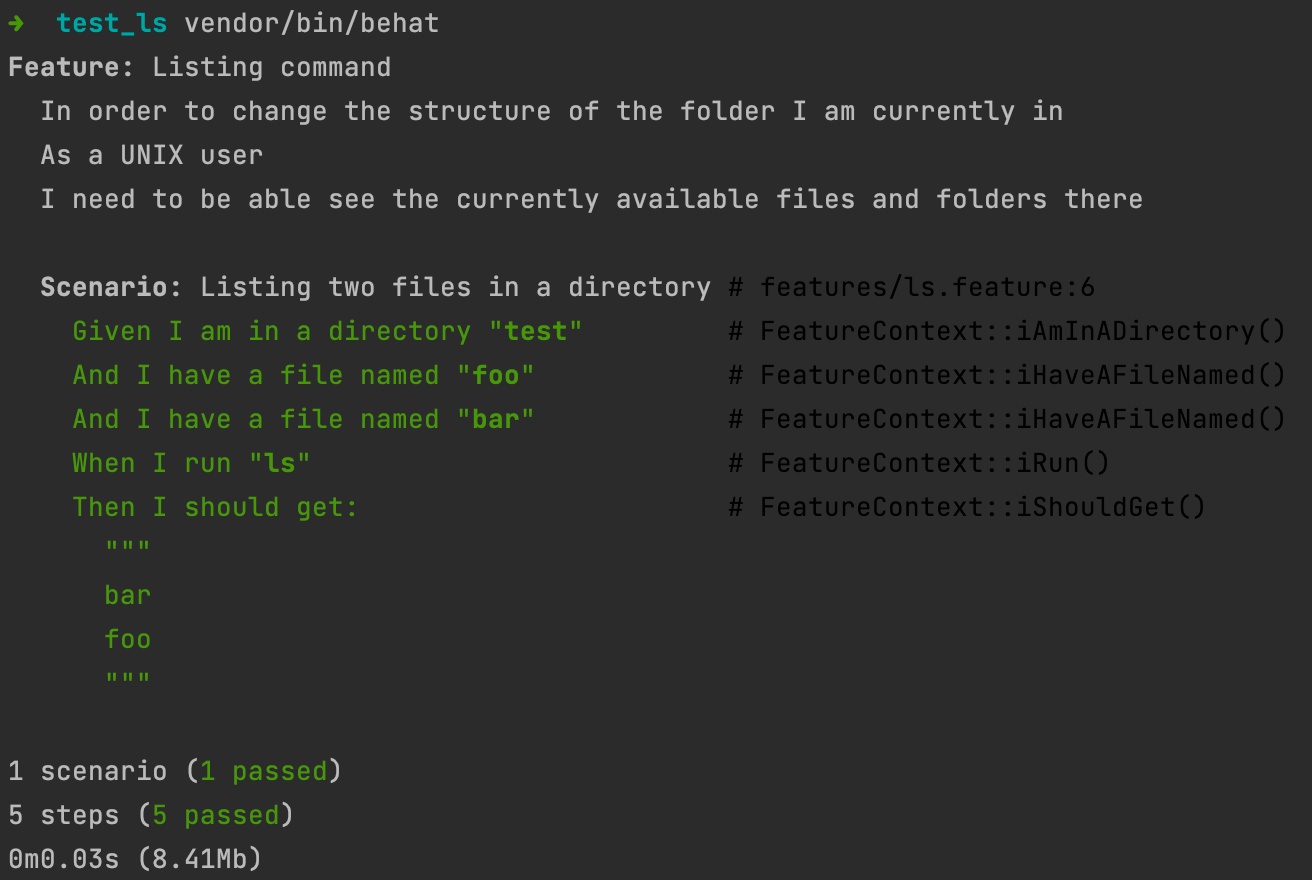
And congratulation for your first behat test 🙌 !
This is obviously not testing your PHP application, but you really have all the basics here. You need an HTTP server to test your app? Just run one! You need a WebSocket server to run your app? Just start it! It's really just how you should do.
Of course, some tasks may become repetitive, this is why we are going to cover some tooling you can use with behat in 2 more articles focused on real-world PHP application testing.
See you next week for the next article! 🤘
Follow us on Twitter! https://twitter.com/swagdotind